Command Prompt – Basic Commands


cmd-basic-commands.webp


a) cls

       CLS refer to “Clear the screen” means the command will help you to clear you’re command prompt screen. It will erase all history of commands which you used before using this command.
       Syntax : cls

b) exit

    The command helps you to close you’re Command Prompt Screen without touching the mouse.
       Syntax : exit

c) type

    Type command helps you to view contains of a file. Means it works like Notepad, you need to provide file after using this command.
       Syntax : type “file location\file name”

d) time

    It will show you current computer time into this command window. Also you can change you’re computer time using this command.
       Syntax : time
Tip: Use Alt + Enter key for run command window into full screen mode.

e) date
       It is similar to time command, time command shows you current Computer time and date command shows you current date of you’re System.
       Syntax : date
f) title
       The command help you to change current window’s title (It only change CMD title not any other window title).
       Syntax : title You’re name here

g) echo
       It only show you you’re message into console window. Mostly the command use into batch file.
       Syntax : echo You’re name here

Learn Command Prompt

Command Prompt (cmd.exe)

Command Prompt is a special program in Windows Operating System which is similar to MS-DOS. Using Command Prompt you can do any thing you want (which you do with regular windows, also you can do much more). And command Prompt supports all Windows Operating system and all types of PC (So you no need to upgrade you’re hardware for learning command Prompt). Learning Command Prompt is a funny Part like learning a computer language. In this blog you will get daily tutorial about Command Prompt. If you want to learn Command Prompt then type you’re email address and subscribe us for daily update.
cmd.webp

If you’re new to use Command Prompt then the tutorial help you, If you know these you can skip these lessons by going our Index menu.

How to Start Command Prompt?

You can start command Prompt using three methods..
      a) By going to Startmenu > All Programs > Accessories > Command Prompt
      b) Goto Startmenu > Run (Or you can use Windows Logo + R shortcut key) and type cmd.exe and press Enter.
      c) You can search cmd on Start menu(Windows 7) or Taskbar(Windows 10)

Commands:

Command Prompt commands are diveded into two parts:-
    1.Internal Commands
    2.External Commands

What is Internal Commands?

Internal commands are those commands which is available into all operating system. Means these commands are available into all Windows Operating System.

example. cd, md, cls

What is External Commands?

External commands are those commands which is not available into all operating system. Means these commands are similar to install a software. You can manually install these commands into you’re own operating system. These commands are mostly kept into .exe or .com file.

example. attrib, tree

Tip: How to know a command is External or Internal?                                         
       Answer : Find the command name in start menu with .exe or .com extension

Learn Internal Commands:

I divided these Internal Commands into 3 Parts. If you know All commands into ‘Basic’ part then you go to do ‘Medium’ Part. If you don’t know one or two commands into Basic Part then do all Basic lessons. Apply Similar method into ‘Advanced’ Part.

Click on the Parts

                      Basic:
                             a)  cls
                             b)  exit
                             c)  type
                             d)  time
                             e)  date
                             f)   title
                             g)  echo


                      Intermediate:

                             h)  cd/chdir
                             i)   del/erase
                             j)   ren/rename
                             k)  rd/rmdir
                             l)   md/mkdir
                             m) copy
                             n)  move
                             o)  color

                             p)  dir

                             q)  pause


                       Advanced:
                             r)  goto
                             s)  call
                             t)  start
                             u)  prompt
                             v)  compact
                             w) convert
                             x)  if
                             y)  ftype
                             z)  for

Quick Heal Emg tool : Virus Database 11 April 2020

Quick Heal Total security is my favorite antivirus. It is use low CPU and better performance than other Antivirus. 1 Year Ago I’m using Avast Antivirus, but when I learned that Avast sell personal data I uninstall Avast. Quick Heal parents control gives me more reliable me. And Quick Heal Emg tool helps you to remove virus from your system completely.


emg-tool.webp

Quick Heal EMG tool features:-
  • It deeply dig out virus from your system
  • No installation needed
  • You will only download it here.
  • It is ISO file, no need to download quick heal with emg package and boot with it.
You need to boot this ISO file using Rufus
Don’t have Rufus? click here

Download Microsoft Office 2010 Portable

Microsoft Office 2010 is a application software which is create by Office Suite. It is use for solving personal or business problems. It is manufacture on April 15, 2010. The Microsoft office 2010 has many features(like User interface, Backstage view etc).




Microsoft-office-2010.webp

Microsoft Office Portable features:
  • Very small (1.2 GB)
  • No Install Needed
  • No need to Activate (It need to activate, but when it tells you to active simple press the next button)
  • Can run from anywhere (such as Pendrive)
  • Works like normal Microsoft Office 2010
  • Doesn’t create any file into your hard disk
  • You can edit file using it
  • Included Word, Excel, PowerPoint, Outlook, Onenote, Infopath, Access, Publisher, Groove.


link-is-ok.webp
Extract the sfx file for use Microsoft Office Portable

Upgrade your Windows 7 to Business PC

Windows 7 Business is best choice for business computer. It has many features. It run on those PC which PC support Windows 7. If you want to Upgrade your Windows 7 to Windows 7 Business PC, The tutorial is very helpful for you.

windows-7.webp


If you want to Upgrade your Windows 7 to Windows 7 Business Follow these steps.

  1. Download Windows 7 business package from given link
  2. Extract the archive to your desktop
  3. Create a folder on C:\ drive named ‘Win7’
  4. Copy ‘Business’ folder to ‘Win7’ folder
  5. Open folder “C:\Win7\Business” and Run ‘Upgrade to Business.cmd’
  6. Then do steps which followed on it

(Disable you antivirus while you are using this program)


Download Microsoft Office 2010

Microsoft Office 2010 helps you to do your business work. It has many features. If you want to download Microsoft Office 2010 click here.

Download Search Everything
Search Everything helps you to find documents file more fast than search index. It index all files in computer after installing search index service.
Download clipx
Clipx helps you to save your all copied data to clipboard. It can restore all copied items to clip board until the hard disk is destroy or user delete the clipboard items.

Download Antivirus
Antivirus keep your PC files secure from Ransom attack or Keylogger. So download Quick Heal Antivirus & update definition to keep safe your files. If you can’t buy Quick Heal you can reset it here.


Share you’re account to you’re friend without giving details

Account is very important in our Digital life. In this account included your personal information or any other necessary files. If you lose this type of data you can lost your time, money and many more. All accounts are protect by a password. These password keep safe your Account. But if anyone know your password he can access your personal information. Also giving these account password/username your personal information may be hack. You can give him your account if you change your password after completing his task. But If your neighbor/friend want to use your account for few days you will be wait for changing password. But sometime you can’t change password (for any reason).


share.webp


            For doing this you need a chrome extension named ‘ShareAccount’. Also you can download using below links. The extension helps you to share you account season for few hours (least 1 hour).

How to share your account without giving your personal details?

  1. Download the extension in your and your friend/neighbor’s computer.
  2. Log in your account (Facebook, twitter etc)
  3. Launch the extension by clicking on the lock icon
  4. Click on ‘Share Account’ button
  5. Goto your friend/neighbor’s computer, launch the extension and click on Receive Account.
  6. Type the friend / neighbor’s computer code into your computer ‘Recipient code’ box
  7. Choose how many time your friend/neighbor will be use your account. (In hours)
  8. Click on the share button.
  9. There you will find  ‘Share Result’ sent it on your neighbor/friend’s computer.
  10. Paste the ‘Share result’ text into your neighbor/friend’s ‘Share Result’ text.
  11. If your neighbor/friend see your account name below ‘Share Result’ box then all is OK
  12. Click on the ‘RECEIVE’ button.
  13. After few seconds you see your account in your neighbor/friend’s PC. Now he/she can access your account for few hours.


shareaccount-receive.webp


Download Now
It’s cool


It only available for Google Chrome

Download your custom boot screen in Windows 7 : Win7bootupdater

Before doing anything you must know that what is windows 7 boot screen.

               Windows 7 boot screen seems like wallpaper. It’s only change your boot theme while you boot your PC. By changing this boot screen you can’t decrease your boot time. This boot animation happens when you will add full activity.bmp or 105 frame png, jpeg, tif or gif. Also you can use bs7 extension file.


How to change your Boot screen?

      You can’t change your boot screen without any software. For changing boot screen you must download Windows 7 boot Updater. You can download Windows 7 boot updater by clicking below download button.


How to apply this theme?

  1.  For applying this theme you must open Command Prompt in windows 7. (Only works for windows 7)
  2. Go to Start Menu>All Programs>Accessories
  3. Right click on Command Prompt and click ‘Run as Administrator’
  4. Confirm your administrator password and press ‘Yes’ button
  5. type cd “YOUR WIN7BOOTUPDATER PATH” and press enter
  6. type the downloaded file name(with .exe format) and type the bs7 file path along with bs7 file and give enter.
  7. wait few seconds for updating your system file.


    IF YOU DO SOMETHING WRONG
    YOUR PC MAY BE UNBOOTABLE
    I WOULDN’T TAKE ANY RESPONABLITY FOR THAT
    USE AT YOUR OWN RISK


    Click below images to download bs7 file


    Download This


    Download This


    Want more boot image? contact me

    What is ISO file and How to modify it?

    Before creating an ISO file you must know that what is a ISO file,
              A ISO file is similar to zip, rar file. It is used for burn DVD, BlueRay Disk, CD. Also it can be used for making bootable pendrive. The ISO file contains some system software’s(Like that Operating System), utility softwares(Kaspersky Rescue Disk, Quick Heal) etc. ISO file mostly used for OS. Some software like PowerISO, UltraISO, WinRAR, 7-ZIP can open this type of file. But you can’t modify ISO file using WinRAR, 7-ZIP. Only PowerISO & UltraISO can modify ISO file.


    Making a ISO file using PowerISO


    poweriso.webp


           PowerISO can edit ISO file. It is fast, safe and using it you can save *.daa(Direct-Access-Archive) *.bin extension file. Using this you can burn a ISO file to DVD. PowerISO support Audio CD, Data CD, Data DVD, Video DVD or VCD and BlueRay Disk. But PowerISO unregistered version can save maximum 300 MB ISO file. There is no limitation for .daa & .bin file.

    System requirement:
    Intel Pentium 166MHz or above. 
    64MB memory. 
    At least 10MB hard disk space. 


    Make a ISO file using UltraISO

    ultraiso.webp


           Also UltraISO can Save ISO file. It can make ISO file from your CD, DVD or Hard Drive. You can extract files and folders from an ISO file. Converting up to 30 CD/DVD image formats (such as NRG, MDS, CCD, etc) to ISO, NRG, MDS and CCD format. Using this you can make bootable CD/DVDs and bootable flash drives.


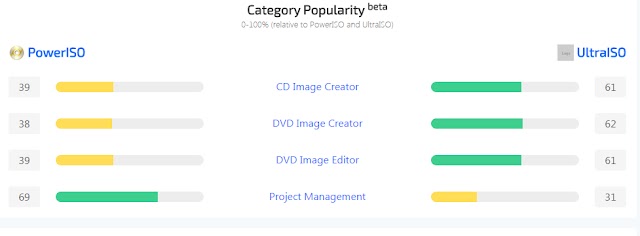
    PowerISO Vs UltraISO


    poweriso-vs-ultraiso.webp

    For creating CD image PowerISO score 39 where UltraISO scored 61
    DVD image creator PowerISO score 38 where UltraISO scored 62
    For DVD image editor PowerISO score 39 where UltraISO scored 61
    and Project management UltraISO score 31 where PowerISO scored 69

    So making CD image, DVD image, DVD image editing tasks can make UltraISO more good than PowerISO.

    So I recommended you to use UltraISO.
    You can download UltraISO Premium from my download link.


    Microsoft .NET framework 4.8 : Not Installing Resolved

    Microsoft .NET framework 4.8 is a software framework which is develop by Microsoft. This software helps you to run another program by fixing Library errors. But some PC doesn’t support .NET framework 4.8 for software or hardware problem. But you need to install .NET framework on your PC. Today I tell you how to install Microsoft .NET framework 4.8



    You can download Microsoft .NET Framework 4.8 from Microsoft site. It is official and virus free. If you’re computer has any problem so you can’t install .NET Framework 4.8 you can use my integrated .NET Framework. I modified some tools into .NET framework. Also I integrated fast installation on it. About 1-2 minutes take to install. It is also full version. No components removed. It is 100% virus free. You can download it by clicking below button. Both x86 and x64 are available.


    Scan Result

    Remove all virus from PC : Kaspersky Rescue Disk

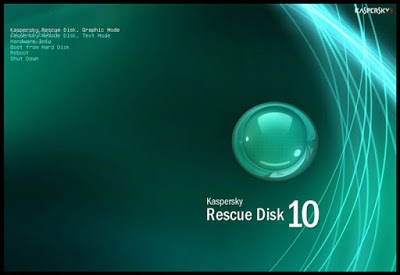
    When virus attack on system deeply it is very hard to dig it out. Normal Antivirus software can’t kill virus properly from system. Only stop the virus process, not kill and clean the virus properly. So we need a portable antivirus in to USB drive. The portable antivirus called ‘Rescue Disk’. Today I will share a rescue disk named ‘Kaspersky Rescue disk’. It is official version of Kaspersky Lab. I packed it on a ISO file. You can boot this ISO file using Rufus portable version.
    kaspersky-rescue-disk.webp


    The Rescue disk helps you to remove malicious virus completely from your PC. You can download this rescue disk free by clicking the below button.

    System Requirements For Kaspersky Rescue Disk

    Before you start Kaspersky Rescue Disk 2019 free download, make sure your PC meets minimum system requirements.
    • Operating System: Windows XP/Vista/7/8/8.1/10
    • Memory (RAM): 1 GB of RAM required.
    • Space Require on Disk: 600 MB
    • Processor: 1 GHz Intel Pentium processor or later.


    How to boot Kaspersky Rescue Disk?

    You can Boot Kaspersky Rescue Disk using Rufus portable version.
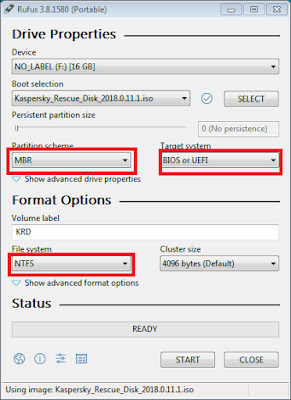
    1. Only Download this ISO file by clicking above button and open the file in Rufus. (Don’t have Rufus? Don’t worry click below image.)
    rkill.webp
    2. Then choose ‘Partition scheme’ as ‘MBR’, ‘Target system’ as ‘BIOS or UEFI’ and ‘File system’ as ‘NTFS’
    3. Click on the start button
    4. It alerts you to ‘Download Require core.img’.(Only for this Rufus which I’m using) Click on the           ‘NO’ button.
    5. Then it ask you that ‘are you want to make the drive bootable using ISO image mode or DD image     mode?’
    6. Choose ‘Write in DD image mode’ and press ‘OK’ button
    7. It warned you to format this drive. Press ‘OK’ button to format.
    8. After completing formatting and copying files when you see ‘Ready’ message on Rufus progress         bar your Pendrive is now ready for Rescue Disk.
    kaspersky-rescue-disk-screenshot.webp
    Design a site like this with WordPress.com
    Get started